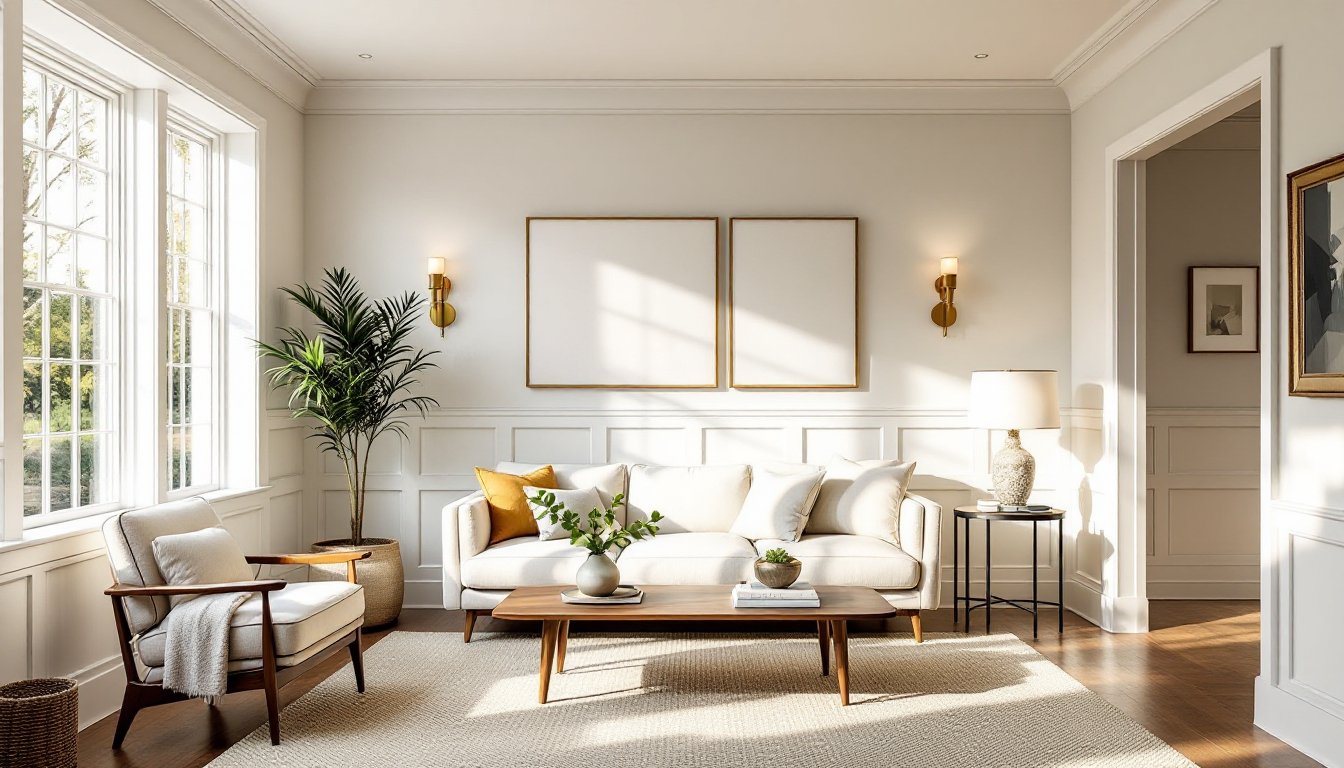
Wainscoting brings character, depth, and architectural detail to a living room, whether your style runs classic, modern, or somewhere in between. This wall treatment, which typically covers the lower third to half of a wall, protects surfaces from everyday wear while adding visual interest that fresh paint alone can’t deliver. Living room wainscoting ideas have gained momentum as homeowners seek permanent, elegant upgrades that boost both resale value and daily enjoyment of their spaces. The beauty of wainscoting is its versatility: you can go traditional with beadboard, clean and contemporary with shaker panels, or bold with board-and-batten. Even better, many styles are achievable for a motivated DIYer with basic carpentry skills and the right prep work.
Table of Contents
ToggleKey Takeaways
- Wainscoting ideas for living rooms come in three main styles—classic beadboard, modern shaker panels, and board-and-batten—each offering distinct aesthetics and durability benefits for your space.
- Proper material acclimation (48 hours), exact measurements, and quality caulking are critical for professional-looking results; DIY installation can save $700–$3,200 compared to professional services.
- Paint color and finish significantly impact the final look—use semi-gloss or satin paint on wainscoting for durability, and pair soft whites or muted tones with contrasting upper walls for visual cohesion.
- Beadboard works best at 30–36 inches high for traditional and farmhouse styles, while shaker-style wainscoting can run 36–48 inches for a more contemporary, integrated look.
- Proper lighting, restrained accessorizing, and careful furniture placement enhance wainscoting’s architectural impact without overwhelming the room’s overall design.
Classic Beadboard Wainscoting
Beadboard is the go-to for cottage, farmhouse, and traditional living rooms. It features vertical or horizontal grooves (the “beads”) that run across sheets of plywood or solid wood, creating visual texture and movement.
Why beadboard works: The grooved pattern catches light beautifully, making walls feel less flat. It’s durable, the textured surface hides minor dings better than flat walls, and pairs well with painted finishes. Standard beadboard sheets come in 4×8 foot panels, typically 3/8 inch thick, with groove spacing ranging from 3 to 6 inches apart.
Material considerations: Real beadboard (solid wood) costs two to three times more than plywood alternatives, but it holds up better long-term and feels more substantial underfoot if you ever need repairs. Prefinished beadboard saves finishing time: unfinished sheets give you complete color control. When selecting, check that grooves are consistent and that sheets are acclimated to your home’s humidity for 48 hours before installation, wood moves, and skipping this step causes buckling.
Best height for living rooms: Beadboard typically runs 30 to 36 inches high, about waist level, which balances proportions in most rooms. Paint it in soft whites, creams, or pale grays for a light, airy feel, or go with muted greens and blues for more personality.
Modern Shaker-Style Wainscoting
Shaker wainscoting uses flat, frame-and-panel construction, essentially small rectangular panels separated by clean rails and stiles. It’s minimalist, architectural, and works in contemporary, transitional, and even farmhouse settings.
Why shaker appeals to modern spaces: The clean lines and geometric symmetry feel intentional and sophisticated without ornament. Each panel creates shadow lines that add subtle depth. Shaker wainscoting can run higher than beadboard (36 to 48 inches), making it feel more integrated with the room’s wall space.
Material and construction: Shaker panels are typically made from hardwood plywood with solid wood frames, or solid wood throughout for premium builds. Panel sizes vary, but 12×24 inch panels are common. The reveal (the shadow line created where the frame sits proud of the panel) is usually 3/8 to 1/2 inch, which catches light and defines the pattern.
Finishing options: Shaker wainscoting takes paint beautifully in whites, grays, and pastels, or rich jewel tones for drama. Stained natural wood versions work if your living room has existing wood trim or cabinetry. The clean design means every gap and seam shows, so surface prep and caulking are non-negotiable, this isn’t a forgiving style.
Board-and-Batten Wainscoting
Board-and-batten is the rustic, farmhouse darling of wainscoting styles. Vertical boards (typically 6 to 10 inches wide) run floor-to-height, with narrow strips (battens) covering the seams. It’s visually bold, textural, and works in contemporary settings as well as traditional ones.
Why board-and-batten stands out: The vertical emphasis draws the eye upward, making ceilings feel higher. The batten strips create pronounced shadow lines, giving walls serious architectural presence. This style is forgiving of imperfect walls because the battens hide gaps and misalignment.
Material choices: Solid wood boards (pine, oak, or reclaimed) create an authentic look but require finishing and maintenance. Engineered boards or plywood sheets with batten overlays cost less and are easier to maintain. Board width, batten width, and spacing all affect the visual impact, narrow boards and battens feel contemporary and delicate, while wide boards read rustic and bold.
Installation reality check: Board-and-batten is one of the more straightforward DIY installations because you’re essentially fastening vertical strips to the wall with a nailer. But, getting boards perfectly vertical (using a level on every 4 feet) is critical. Battens then cover fasteners and gaps. The visual payoff is worth the careful layout work. Paint it in whites or warm neutrals for a coastal feel, or deep charcoal and black for modern edge. Browse interior design ideas on Decoist for living room combinations that pair board-and-batten with complementary architectural details.
Paint Colors and Finishes That Work Best
Color choice matters more than most DIYers expect. The wrong paint can make wainscoting feel dated or claustrophobic: the right choice makes it a feature.
Classic combinations: White or off-white wainscoting with painted walls above is the safest, timeless choice. The contrast creates a visual break that makes the room feel organized. Soft whites (like Benjamin Moore’s Swiss Coffee or Sherwin-Williams’ Alabaster) feel warmer than pure white. Light gray wainscoting with a slightly deeper gray above creates subtle sophistication.
Contemporary and bold routes: Muted greens, blues, and warm taupes on wainscoting bring personality without overwhelming. Paint the upper wall white or the same color in a lighter tint for cohesion. Navy or charcoal wainscoting with white or cream above creates drama suitable for eclectic or modern living rooms.
Finish quality: Use semi-gloss or satin-finish paint for wainscoting, it resists dust, cleans easily, and handles moisture better than flat paint. Flat paint on walls above reads less formal and hides wall imperfections. Two coats of quality semi-gloss is the minimum: expect three coats on dark colors. Primer is non-negotiable: it blocks stains, improves adhesion, and ensures true color payoff.
Practical note: Paint samples on your actual wainscoting or a large foam board in your room’s light, and view them at different times of day. North-facing rooms favor warm whites: south-facing rooms can handle cooler tones.
Installation Tips for DIY Success
Professional installation runs $1,500 to $4,000 for a typical living room, depending on style and complexity. DIY installation can cut that to $200–$800 in materials, but demands patience and precision.
Essential prep work: Measure twice, cut once. Locate studs with a stud finder and mark them, you’ll fasten panels or battens to studs for strength. Remove baseboards and trim the wall, patching any holes. Paint the upper wall before wainscoting goes up (it’s easier to cut in around finished wainscoting later). Ensure the wall is plumb (vertical): out-of-plumb walls mean panels won’t align and gaps will show.
Tools you’ll need: Miter saw or circular saw (cleaner angle cuts on trim), level, stud finder, nail gun with finish nails or brad nailer, caulk gun, pencil, and tape measure. A table saw helps if ripping boards to width. Wear safety glasses and a dust mask, sawdust accumulates fast.
Fastening approach: Use finish nails (1.5 to 2 inches, depending on panel thickness) spaced every 12 to 16 inches into studs. A finish nailer saves time and leaves smaller holes. Countersink nails slightly and fill holes with paintable caulk or wood filler, then sand smooth before painting. Gaps between panels and trim need caulk (paintable, not silicone), this step separates pro-looking jobs from DIY-looking ones.
Common mistakes: Skipping caulk, using mismatched fastener types, not acclimating materials to humidity, and installing without checking for plumb. Take your time on layout, bad layout compounds across the entire room. For beadboard and shaker styles, check Houzz for professional installation references if you feel uncertain at any stage.
Styling Your Living Room With Wainscoting
Wainscoting is a background feature, but it sets the stage for everything else in your room.
Furniture placement: Wainscoting doesn’t change how you arrange seating, but it does anchor the room visually. A sofa backed against a board-and-batten wall gains weight and presence. Wainscoting reads traditional with a wingback chair and side table, or modern with clean-lined seating in contrasting colors.
Accessorizing: Keep decor balanced. Simple wainscoting (especially if painted white) pairs well with bold artwork, patterned rugs, and varied textures. Textured wainscoting (beadboard) can feel busy with busy decor, lean toward solid-color accents and let the walls breathe. Avoid wallpaper above wainscoting unless it’s subtle, competing patterns cheapen the effect.
Lighting matters: Wainscoting creates shadow lines that look best with adequate lighting. Sconces flanking artwork or a fireplace highlight the texture. Avoid overhead lights alone: layer in table lamps and ambient lighting to show off your work.
Living room wainscoting ideas from design sites: Check Homedit’s furniture and decor guides for real-room examples showing wainscoting paired with different aesthetics. Many spaces combine wainscoting with fireplace surrounds, built-in shelving, or accent walls for layered visual interest. Crown molding above wainscoting ties everything together, though it’s optional and adds cost.
Conclusion
Wainscoting transforms a living room from flat to architectural with one strategic upgrade. Whether you choose classic beadboard, modern shaker panels, or bold board-and-batten, the key is careful measurement, quality materials acclimated to your space, and meticulous prep work. Start with a single wall to build confidence, then expand if you love the result. The payoff, a room with character, durability, and timeless appeal, makes the effort worthwhile.